Styrofoam Sculpture: Engaging the Space

Consider the Elements and Principles of 3D Art & Design.

  1. Generating Ideas: 
    • Choose 3 areas to work on in the Studio Habits of Mind Rubric.
    • Begin by exploring this new material.
    • Try out different ways to manipulate, cut, attach, and glue the pieces together.
  2. Researching:
    1. Think about your Theme/Subject
                                 Google Search: Styrofoam Cup Sculpture
                                 Google Search: Styrofoam Cup Relief
    2. What type of sculpture do you want to make?:
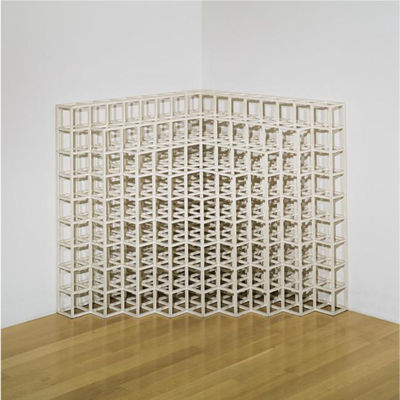
                             1.   Relief: Sculpture that extends from a surface, like the wall
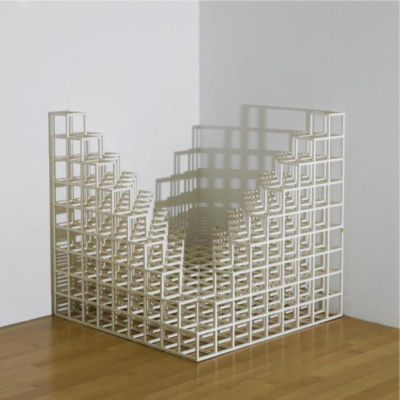
      2.   In the Round: Sculpture that can be viewed from all sides
    3. What techniques will you use?
  3. Visual Development
    Create a sketch in your sketchbook for your design.
  4. Final Design
    Requirements:
    Must create an artwork that shows:
    a. experimentation with materials
    b. intentional Positive & Negative Space development
    c. completed artwork with a completed design
    d. artwork is interesting from all sides
    e. Constructed neatly and carefully
  5. Refinement: 
    • When you have completed the majority of your project, make sure you begin refining your design. Think about the following things:
      • Clean up your glue areas, making sure there are no messy areas that is tract from your design.
      • Make sure that you have GOOD CRAFTSMANSHIP in your cut out areas.
      • Make sure that you have GOOD CRAFTSMANSHIP when gluing/attaching the project together (construction). Ask three people around the room if they notice any areas that need attention.
      • Continue to analyze your project to see if any areas need to be refined or changed to fit the project rubric requirements (refer to the Studio Habits of Mind and your chosen 3 areas).
  6. Evaluation:
    • Turn in pictures of your completed work on Your Edublogs.org Blog.

Modular Sculptures

rsweeney

Richard Sweeney

From the website: “Richard Sweeney was born in Huddersfield, England in 1984. He discovered a natural talent for sculpture at Batley School of Art and Design in 2002, which led him to the study of Three Dimensional Design at the Manchester Metropolitan University, where he concentrated on the hands-on manipulation of paper to create design models, which ultimately developed into sculptural pieces in their own right.”

 Sol-LeWitt 109 44579_LEWITT_v01 lewitt

Sol LeWitt

Sol LeWitt was one of the pioneering figures in both the Conceptual and Minimalist art movements of the 1960s and ’70s. Whether working as a painter, draftsman, photographer, printmaker, or sculptor, LeWitt conceived works of art that were fundamentally geometric and architectonic, and relied on the cube as a starting point for his explorations of space, time, form, volume, repetition, sequence, and variation.

Objectives:

Create a sculpture, abstract or objective, using recyclable materials. Demonstrate knowledge of creating movement and emphasis in a 3D form while keeping in mind the importance of physical and visual balance.

Requirements:

  • Each student must create a total of at least 20 modules
  • The sculpture must be able to support itself (this may vary depending on how it is displayed)
  • Movement is displayed within the form (making straight lines look curved)
  • Emphasis or focal point is displayed within the sculpture
  • Use of recyclable paper such as computer paper, newspaper, or magazines

Possible Ideas:

  • May work in partnerships or groups (the work load does not change for each student)
  • May include the use of a base (cardboard, wood, mat board)
  • Sculpture can be made to mount on a wall, sit on a table, or hang from the ceiling
  • Sculptures may be painted (bring your own spray paint)
  • Paper tubes and modules may vary in size
  • Modules may vary in shape, size, or design (doesn’t necessarily have to be a triangle or square)

Procedures:

  • Roll paper tubes from paper cut approximately 5.5 x 4 inches in size.
  • From these paper tubes, create modules by gluing at least 3 tubes together.
  • Use a minimum of 20 modules, gluing them together, using either hot glue (you provide your own hot glue sticks) or Elmer’s glue to create the sculpture.
  • Paint if needed.
  • Add a base if needed or devise a way to mount or hang from wall or ceiling.

Things you should ALWAYS do:

  • Keep your project neat when working with glue = Craftsmanship!
  • Be patient when gluing (more doesn’t always equal better!)
  • Be aware of the amount of weight your sculpture needs to hold up
  • Create movement in your sculpture (twisting, branching out, spiral designs, etc.)
  • Create an emphasis (a place of interest in color or design)

Things you should NEVER do:

  • Pile up modules and glob them together with glue
  • Leave a mess at your table
  • Eat the glue

Sculpture Proposal

Ceramic Teapot

teapot Teapot by Kazem Arshi

 For my wheel throwers: making a teapot combines everything you’ve learned so far about using the wheel to throw clay. It’s a challenging exercise, and it may require several tries to get it right. Don’t give up! If you end up making a few nonfunctional teapots, you can always turn them into pieces of sculpture.

teapot9

 Teapot by Sticks & Stones Studio

Planning Your Teapot

Before you begin, decide on your desired teapot shape. It can be squat, tall, narrow, or cone-shaped. Make a simple drawing of the shape and outline the profile. Then sketch a lid. As you consider your ideas about a teapot, ask yourself:

  • Will the lid be flat or domed?
  • Will it rise out of the pot or sink into the opening?
  • What type of knob will it have – thrown or hand-built?
  • Does the lid shape complement the form?
  • Do you want to place the handle over the lid, on top of the shoulders of the pot – or on the side, opposite the spout?
  • What size spout complements the shape?
Post sketches to your blog!

teapot4

 Teapot by Marion Angelica

Making Your Teapot

teapot parts

10991385_10103309665620600_8543969071467075593_n

10994173_10103310745346820_1695107647393269597_n

teapots

Make sure you use the same clay for every part of your teapot: body, lid, spout, and handle. Throw or form these pieces all at the same time so that they will shrink at the same rate, fit together better, and the measurements will be more accurate. You can assemble the pieces at another time, but remember to cover them in plastic to keep them workable.

teapot3

 Teapot by T. Jeffreys

  • Throw or hand-build the body of the teapot.
  • Measure the diameter of the opening and create a flanged lid.
  • Pull or throw the handle. Shape it and allow it to stiffen.
  • Throw or hand-build the spout (and a few extras).
  • Let all pieces stiffen to leather-hard.
  • Trim or attach a foot ring on your pot before you attach the spout and handle.
  • Hold the spout against the side wall and adjust its fit.

teapot5

 Caravan Teapot by Pheasant

Note: Make sure the top of the spout is as high as or higher than the top of the pot. If the spout is too low, tea will spill out when the pot is filled.

teapot18

 “Lip Service Teapot” by Dixie Biggs

  • Trace around the spout on the wall.
  • Supporting the wall, cut a series of holes within the outline.
  • Smooth rough edges with a damp sponge.
  • Score and slip the base of the spout and the traced outline on the pot.
  • Press the two pieces firmly together and smooth around the join. You can reinforce the join with a thin coil and smooth it with your finger or the edge of a wooden tool.
  • Balance the placement of the handle.
  • Score, slip, and join the handle to the pot.
  • Let your teapot dry slowly with the lid in place.

16638097178_7c52851ec3_k

Teapot by Ms. Long – lid also doubles as a tea cup!

Post your GREENWARE to your blog before turning it in to be fired.
  • Bisque fire, decorate, and glaze fire.

teapot8

 Teapot by Natalya Sots

More Teapot Ideas from Pinterest
How to Hand-build an Expressive Teapot Set Using Soft Slabs
How to Make an Inverted Strainer
The 30 Minute Teapot