AP 3D Design Portfolio: Concentration Ideas

  1. Create pottery vessels both handmade and wheel thrown
  2. Build assemblages based on the works of Louise Nevelson
  3. Design and construct theatrical set models
  4. Build a series of wood constructions showing movement through space
  5. Build kinetic sculptures based on Alexander Calder
  6. Create a series of soft sculptures
  7. Build found object figurative sculptures based on Marisol
  8. Carve soap stone memorial/monument sculptures
  9. Use foam core to create a park landscape sculpture
  10. Coil built sculptural humanoid forms
  11. Do a series of wheel works that are raku fired
  12. Throw a set of dishes based on textures found along a rough coastline
  13. Sculpt a series of naughty children
  14. Design and illustrate pop-up books
  15. Do a series of fiber works, such as weavings, feltings, etc…
  16. Do your personal history depicted in bas relief
  17. Design and construct educational toys
  18. Design and build a theatrical set: actual size
  19. Do a series of installations
  20. Create a series of artist’s books
  21. Cast a sculptural series of simplified forms based on Constantin Brancusi
  22. Experiment with slips and Japanese surface decorations on simplified wheel ware
  23. Do a sculptural series of environments
  24. Do a series of found object sculptures
  25. Do a series of earth works in the style of Andrew Goldsworthy
  26. Develop some special effects
  27. Create masks for a movie production
  28. Work with neon and terra cotta
  29. Sculpt distorted human forms inspired by Fernando Botero
  30. Sculpt the heroes of literature
  31. Sculpt the goddesses of different primitive or indigenous religions
  32. Design a car from paper to clay
  33. Design an amusement park inspired by physics
  34. Do a ceramic series building and firing in the technique of Maria Martinez
  35. Do a series of sculptures with found objects that emphasize movement
  36. Work with the figure and plaster
  37. Use fiber as a sculptural form in human depictions
  38. Do a series of wrappings based on the works of Christo
  39. Draw a fantasy boxes giving homage to the media darlings in the style of Joseph Cornell
  40. Do a series of personality furniture 

Concentration Caution List

Although some of the concentration ideas are on the previous…this teacher was suggesting that concentrations contain more depth and cautioned against over used themes.

 In 2007, over 30,000 AP portfolios were graded in one week. After viewing hundreds of portfolios, it is easy to spot recurring themes. Below is a list of very popular subjects for concentration. There is not a taboo on the following subjects, but a warning that they have been done OVER and OVER. It would be easier to find a new topic rather than find a completely new way to address these tired, overused concentrations. Be creative: think of something specific and unique. If you must use the following ideas, find an exceptional, distinctive approach to them.

PROCEED WITH CAUTION ON THE FOLLOWING TOPICS:

provide more focus and depth to the subject and progression of work

* portraits of emotions

* people who shape me

* nature

* memories

* shocking viewers with bizarre

* surrealism

* faces

* flowers

* eyes

* family and friends

* reflective gears

* illustration of inner thoughts

* moments I was happy

* self portraits

* music

* everyday life objects

* goddess/myth

* “different cultures”

* guitars

* reflections

* “ideas of beauty”

* dance

Print Friendly, PDF & Email

Collaborative Elements of Art

Materials:

  • 18×24″ drawing paper
  • Glue
  • Colored Pencils
  • Oil Pastels
  • 1×1″ square with pattern/design (one per student)

Vocabulary:

  • Collaboration
  • Craftsmanship
  • Non-Objective
  • Composition

Objective:

  • The student will be able to work with others at their table to collaborate in designing a cohesive work of art by starting with 4 small squares.

TEKS:

  • 117.302 C.1.B.C.D
  • 117.302 C.2.E.F
  • 117.302 C.4.A

Lesson:

  1. Students, today you will be collaborating.
  2. Discuss with a partner at your table: What is collaboration? What does it look like? What norms need to be set in place? What works? What does NOT work?
  3. Each student receives a 1×1″ square with a design on it and each table receives a 18×24″ sheet of paper.
  4. Students, glue your squares anywhere on the big sheet of paper.
  5. As a table, you will decide and collaborate on how to create a cohesive work of art that blends and melds the 4 squares into ONE work of art (so the squares disappear into the design).
  6. The work needs to flow and work together for unity.
  7. After a few minutes, students will rotate the sheet of paper to give them a chance to focus on another area of the paper (do this a few times).
  8. Reminder: keep the images NON-OBJECTIVE.
  9. Outline your designs with a sharpie.
  10. Choose colors and make sure there is no area left white (nothing larger than 1×1″).

Print Friendly, PDF & Email

Agamograph Alternate Assignment

Rubric:

Composition (0-25 points):
Did you plan your design carefully? Do your eyes line up with your alter ego? Did you employ the elements of art and principles of design?

Craftsmanship/Presentation (0-25 points):
Is the work complete? Are all marks intentional? No rips, tears, smudges, folds, stains, etc. The work needs to be presented properly. Folds in poster board are clean and evenly spaced. No heavy glue around the edges.

Following Directions (0-25 points):
Did you follow the criteria to complete the piece? Did you use most of your time to make improvements when needed?

Design Concept (0-25 points):
Did you create an original composition? Is plagiarism of imagery involved? How aesthetically pleasing or visually interesting is the work?

Print Friendly, PDF & Email

Empty Bowls

emptybowls

North Texas Food Bank Website

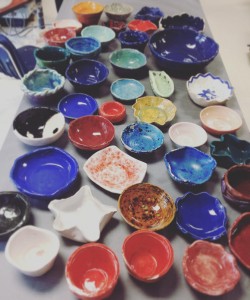
North Texas Food Bank Facebook

Empty Bowls is a fundraiser for the North Texas Food Bank. People pay to attend and pay extra to get a handmade bowl specifically made and donated by area schools and artists. They have an auction for the really awesome bowls and vases donated to the cause. People come and enjoy food from vendors and pick out their bowls and give money to feeding the hungry.  We are going to participate this year in making bowls for this occasion.  The bowls need to have smooth edges (nothing left sharp) and be finished in some way with glaze, paint, or stain. They need your signature on the bottom and will represent your school.

Assignment:

Create at least 2 bowls with smooth edges and finished with glazes. Preferably ^6 (cone 6) glazes for durability. Pick the best one to donate to Empty Bowls.

  • At least 6″ in diameter
  • Smooth edges
  • Sign the bottoms
  • Finish with glaze, paint, or stain
  • Best one goes to Empty Bowls
  1. Post 3 Sketches for bowls to your blog. Due tomorrow.
  2. Post Greenware to your blog. Due next Friday.
  3. Post Glazeware to your blog.

Throwing Bowls on the Wheel

Ideas for bowls:

Pinterest Board Ceramic Bowls

Slab Bowls:

Wheel Thrown Bowls:

Coil Bowls:

Dip Bowls:

Altered Bowls:

Bowls with Texture:

Print Friendly, PDF & Email

One-Point Perspective City

Drawing a cityscape in one-point perspective includes a horizon line, vanishing point, and being able to find the center of objects that point towards the vanishing point.

  1. Begin with a horizon line.
  2. Draw your vanishing point.
  3. Draw a road coming from the vanishing point using converging lines.
  4. Draw squares/rectangles along the road and use converging lines to turn them into buildings.
  5. Add details to the road and buildings using converging lines and the technique in the video below to find the center of objects.
  6. Finish adding your details.
  7. Must have a road, a crosswalk, details on the ground and in the sky, and at least 5 buildings with windows and doors.

This drawing shows how to draw details in the road like sidewalk and crosswalks.

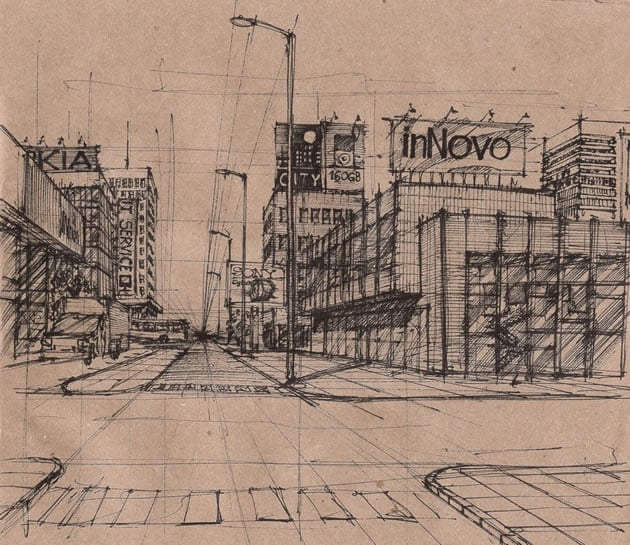
Cityscapes tend to be boring and lifeless, but once mastered can spring to life like this drawing above.


Here’s a great website for more information on One-Point Perspective:

One-Point Perspective: The Ultimate Guide
Print Friendly, PDF & Email

One-Point Perspective Room

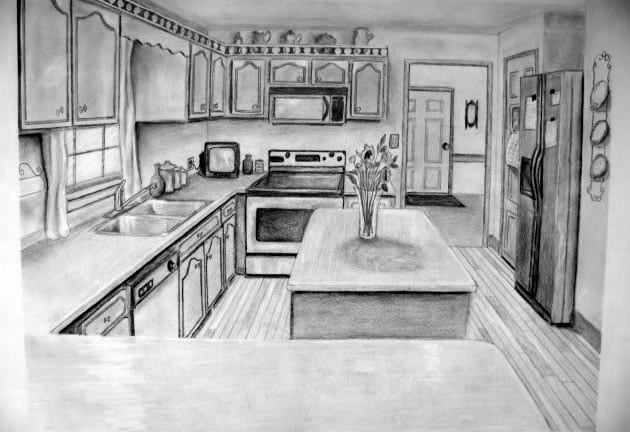
Today we will learn how to draw a room in perspective like the video below. You will then be able to create other interior spaces.

  1. Draw your vanishing point in the middle of the paper.
  2. Draw a square/rectangle around the vanishing point.
  3. Draw diagonal or converging lines from the vanishing points through the corners of your square/rectangle to the edges of the paper. These lines will map out the walls, ceiling, and floor.
  4. To draw things along the back wall, use horizontal and vertical lines.
  5. To draw things along the side walls use converging lines to the vanishing point for the top and bottom of the object. For the ceiling and walls, use converging lines for the sides of the object.
  6. To draw round objects in one-point perspective, watch the video below.
  7. To find the center of objects using one-point perspective, watch the other video below.
  8. Draw in the details and finishing your drawing using some shading.
  9. Draw at least 3 pieces of furniture, 1 door, 1 window, 2 things on the wall (picture frames, etc), and flooring (tile or wood slats) and rug.

Above we see a space that was mapped out beforehand in the picture above and details filled in below as they are complicated shapes and need to all be placed before finishing.

These videos will also come in handy:

Print Friendly, PDF & Email