One-Point Perspective Room

Today we will learn how to draw a room in perspective like the video below. You will then be able to create other interior spaces.

  1. Draw your vanishing point in the middle of the paper.
  2. Draw a square/rectangle around the vanishing point.
  3. Draw diagonal or converging lines from the vanishing points through the corners of your square/rectangle to the edges of the paper. These lines will map out the walls, ceiling, and floor.
  4. To draw things along the back wall, use horizontal and vertical lines.
  5. To draw things along the side walls use converging lines to the vanishing point for the top and bottom of the object. For the ceiling and walls, use converging lines for the sides of the object.
  6. To draw round objects in one-point perspective, watch the video below.
  7. To find the center of objects using one-point perspective, watch the other video below.
  8. Draw in the details and finishing your drawing using some shading.
  9. Draw at least 3 pieces of furniture, 1 door, 1 window, 2 things on the wall (picture frames, etc), and flooring (tile or wood slats) and rug.

Above we see a space that was mapped out beforehand in the picture above and details filled in below as they are complicated shapes and need to all be placed before finishing.

These videos will also come in handy:

Print Friendly, PDF & Email

Three-Point Perspective City

  1. Draw your horizon line in the bottom quarter of your paper, and add two vanishing points as you would if you were making a two-point perspective drawing.
    photo 1-8
  2. Place one more vanishing point above the horizon line at the top and center of your paper.
    photo 2-8
  3. Begin your shape with the FRONT EDGE first. This line should be placed vertically and aimed toward the vanishing point #3.
    photo 3-5
  4. Draw converging lines to both vanishing points at the far ends of the horizon line.
    photo 1-7
  5. Draw another “vertical line” between the converging lines on either side of the front edge. These “vertical lines” must be aimed toward the vanishing point on the top of the paper.
    photo 2-7
  6. When adding details (windows and doors), all typical horizontal lines will go to the bottom two vanishing points, and the vertical lines will be aimed at the vanishing point above.
    photo 3-4

In your sketchbook:

Create a three-point perspective composition.

Must include:

  • Three buildings
  • Windows
  • Doors
  • Sidewalk

Examples:

3pointsc01

3ptpersp

Print Friendly, PDF & Email

One-Point Perspective Name

  1. Begin by writing your name and drawing block lettering around it.
    photo 1-6
  2. Erase the interior lines on your letters and you are left with block letters.
    photo 2-6
  3. Draw a vanishing point above or below your name.photo 3-3
  4. Draw converging lines from each corner, or create a tangent line to the vanishing point from rounded edges. Draw parallel lines to complete the forms.photo 4
  5. Continue until all the letters have converging lines and parallel lines.photo 1
  6. Erase the converging lines and you are left with your name in one-point perspective.photo 2
  7. Add shading to the sides and a cast shadow to give it a more three-dimensional feel.

photo 3


Print Friendly, PDF & Email

Two-Point Perspective Forms

  1. Start with a horizon line, splitting your paper in half.
    photo 1-3
  2. This time you will need TWO vanishing points. Place them on the far ends of your horizon line.
    photo
  3. Begin your shape (cube/rectangular prism) with the FRONT EDGE first (vertical line). This will determine the height of your shape. Place it near the center of the paper, but below the horizon line.
    photo 1-5
  4. Draw the converging lines to both vanishing points.
    photo 2-5
  5. Draw another vertical line between the converging lines on either side of the front edge. This will determine the thickness of your form.
    photo 3-2
  6. Now draw the back corners to the vanishing points on the opposite side of the paper (the right corner goes to the left vanishing point, and the left corner to the right vanishing point).
    photo 1-4
  7. Erase the leftover converging lines revealing your form in two-point perspective.
    photo 2-4

Sketchbook Assignment:

Complete this exercise (Due Tomorrow):
Create a composition that includes 6 different cubes/rectangular prisms.
  • Two above the horizon line
  • Two on the horizon line
  • Two below the horizon line
  • They do not have to be equal distance from each vanishing point. Some can be closer to one than the other to show a different angle.
Print Friendly, PDF & Email

One-Point Perspective Forms

Today we will practice drawing in one-point perspective with a geometric form. We will learn these vocabulary words: horizon line, vanishing point, converging lines, parallel lines, geometric shapes/forms.

  1. We will begin our drawings with a horizon line, which is a straight, horizontal line, across the entire page. Draw this one in the middle of your paper.
    photo 1-3
  2. Place a vanishing point in the center of your paper on the horizon line. This will be where everything will converge.
    photo 2-3
  3. Draw the front side of a simple geometric shape (square, rectangle, circle, hexagon, triangle, shapes found in math).
    photo 3-1
  4. Connect the closest corners of the shape to the vanishing point with converging lines (the lines that converge at the vanishing point).
    photo 1-2
  5. Complete the back side of your form by keeping the lines parallel (or going in the same direction) to the front side.
    photo 2-2

For your sketchbook assignment:

Draw a one-point perspective composition: Due Tomrrow

Must include:

  • Horizon line
  • Vanishing point
  • Minimum of 8 geometric objects
  • Converging lines made with a ruler

Composition must have at least:

  • two objects below the horizon line (bird’s eye view)
  • two objects on the horizon line (eye level)
  • two objects above the horizon line (ant’s eye view)
  • two objects anywhere

photo 3

Print Friendly, PDF & Email

Vase/Faces Exercise

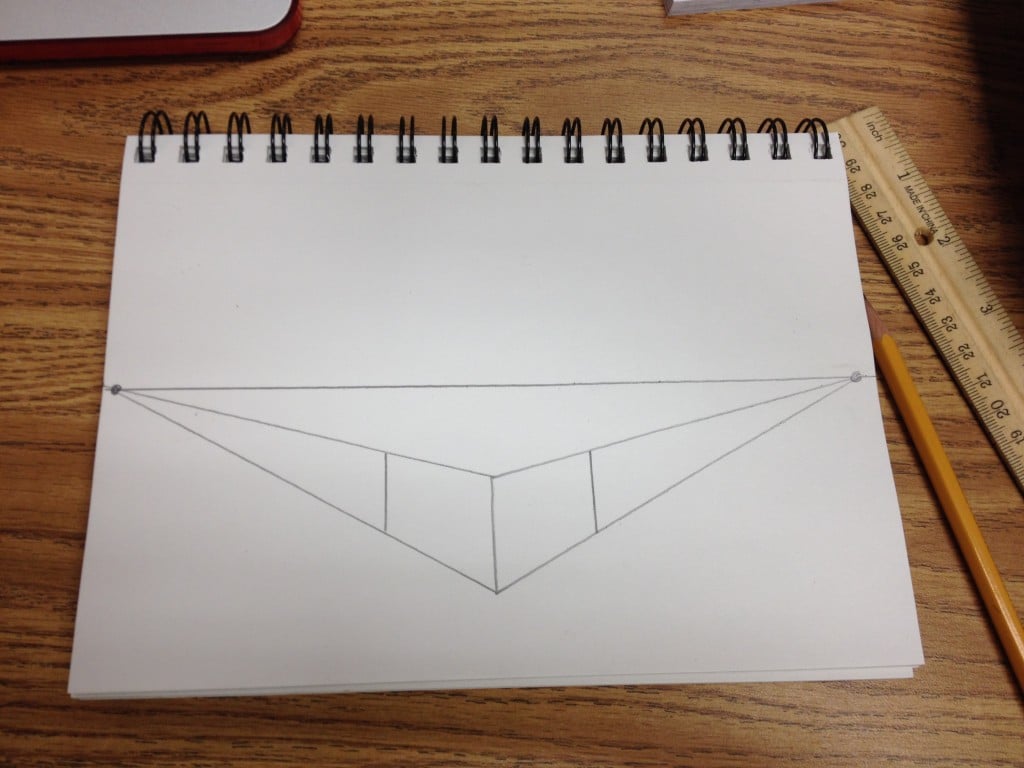
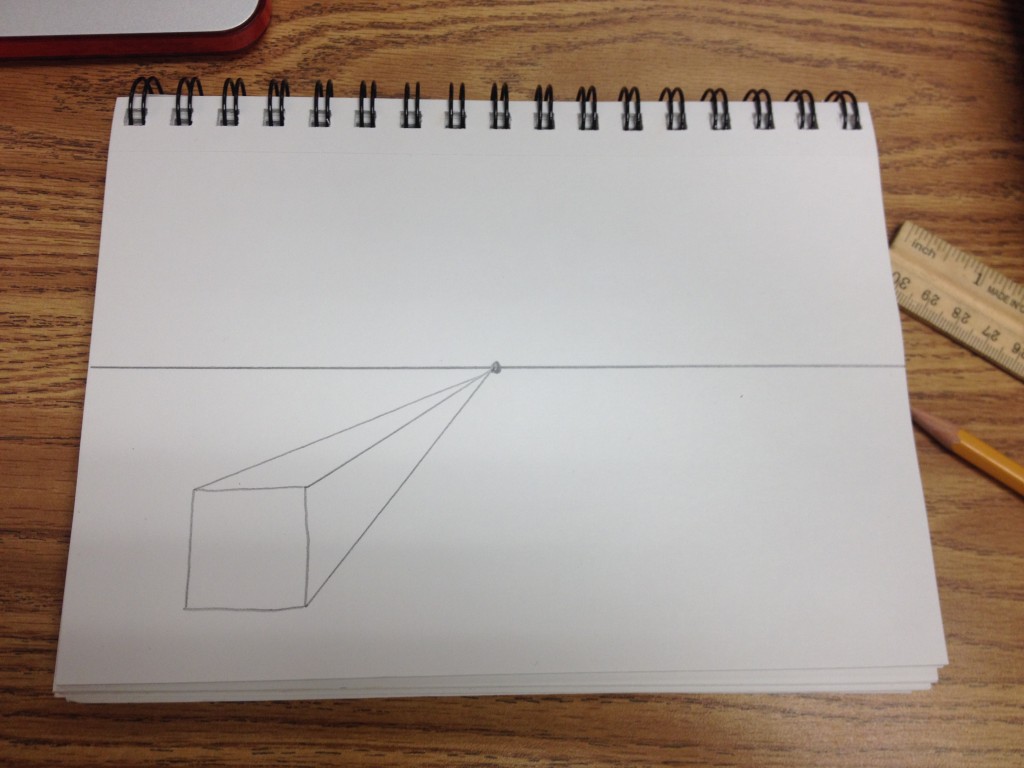
I cannot teach you how to draw, but I can teach you how to look at things differently to engage the visual, spacial centers in your brain. To do this, we have to work our way through a couple exercises. One will create conflict between the verbal and the visual centers of your brain, and the other will help resolved this conflict.

The first one involves thinking of our profile (or side view) of a face in the Vase/Faces drawing.

The excerpt below is from the wonderful book, “Drawing on the Right Side of the Brain” by Betty Edwards.

This exercise is specifically designed to help you understand the shift from the dominant verbal center of your brain to the subdominant visual center.

What you’ll need:

facevase

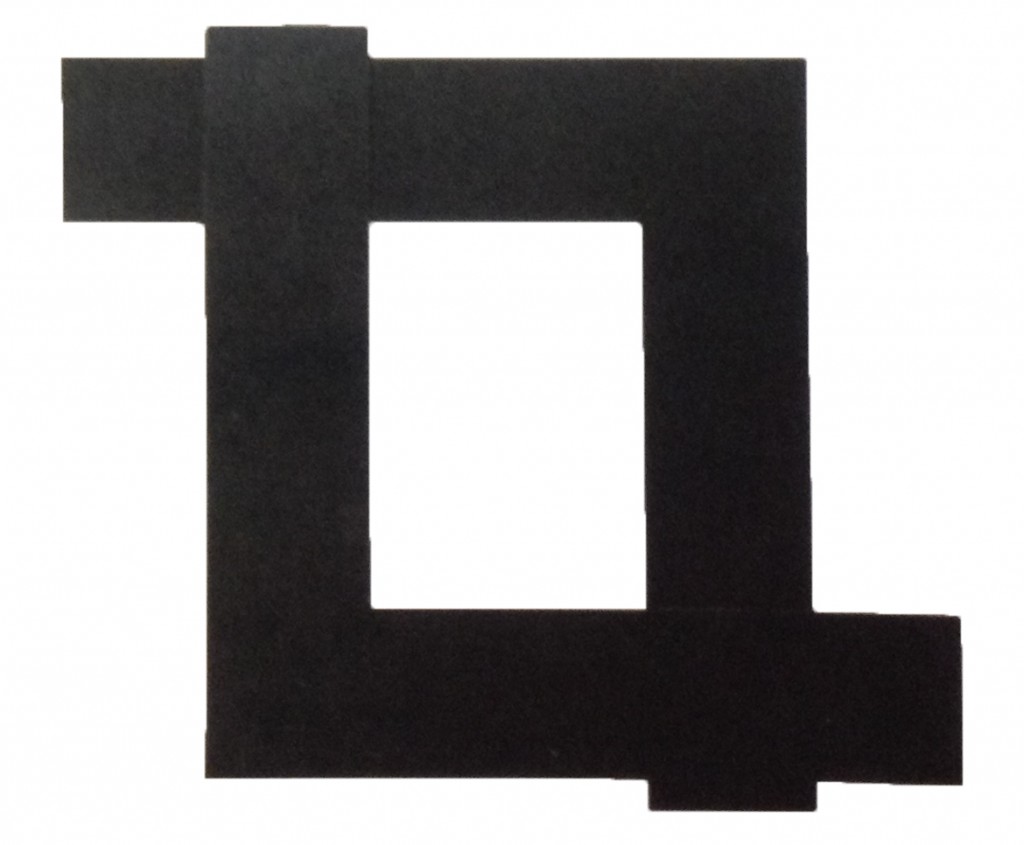
The picture above is a famous optical-illusion drawing called “Vase/Faces” because it can be seen as either two facing profiles or a symmetrical vase in the center.

What you’ll do:

You will complete the second profile, which will inadvertently complete the symmetrical vase in the center.

Before you begin: Read all the directions for the exercise.
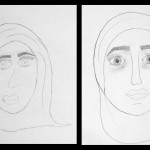
  1. Copy the pattern or print it out. If you are right-handed, copy the profile on the left side of the paper, facing toward the center. If you are left-handed, draw the profile on the right side, facing toward the center. Examples are both of left and right handed drawings. Make up your own version of the profile if you wish.
  2. Next, draw horizontal lines at the top and bottom of your profile, forming top and bottom of the vase.
  3. Now, redraw the profile on your “Vace/Faces” pattern. Just take your pencil and go over the lines, naming the parts as you go, like this: “Forehead… nose… upper lip… lower lip… chin… neck.” You might even do that a second time, redrawing one more time and really thinking to yourself what those terms mean.
  4. Then, go to the other side and start to draw the missing profile that will complete the symmetrical vase.
  5. When you get to somewhere around the forehead or nose, you may begin perhaps to experience some confusion or conflict. Observe this as it happens.
  6. The purpose of this exercise is for you to self-observe: “How do I solve the problem?”
Begin the exercise now. It should take you about five or six minutes.
Why you did this exercise:

Nearly everyone experiences some confusion or conflict while doing this exercise. A few people experience a great deal of conflict, even a moment of paralysis. If this happened to you, you may have come to a point where you needed to change direction in the drawing, but didn’t know which way to go. The conflict may have been so great that you could not make your hand move the pencil to the right or the left.

That is the purpose of this exercise: to create conflict so that each person can experience in their own minds the mental “crunch” that can occur when instructions are inappropriate to the task at hand. I believe that the conflict can be explained as follows:

I gave you instructions that strongly “plugged in” the verbal system in the brain. Remember that I insisted that you name each part of the profile and I said, “Now, really think what those terms mean.” Then I gave you a task (to complete the second profile and simultaneously the vase) that can only be done by shifting to the visual, spacial mode of the brain. This is the part of the brain that can perceive and nonverbally assess relationship of sizes, curves, angles, and shapes.

The difficulty of making that mental shift causes a feeling of conflict and confusion – and even a momentary mental paralysis. You may have found a way to solve the problem, thereby enabling yourself to complete the second profile and therefore the symmetrical vase.

How did you solve it?
  • By deciding not to think of the names of the features?
  • By shifting your focus from the face-shapes to the vase-shapes?
  • By using a grid (drawing vertical and horizontal lines to help you see relationships)? Or perhaps by marking points where the outermost and innermost curves occurred?
  • By drawing from the bottom up rather than from the top down?
  • By deciding that you didn’t care whether the vase was symmetrical or not and drawing any old memorized profile just to finish with the exercise? (With this last decision, the verbal system “won” and the visual system “lost.”)

Did you use your eraser to “fix up” your drawing? If so, did you feel guilty? If so, why? (The verbal system has a set of memorized rules, one of which may be, “You can’t use an eraser unless the teacher says it’s okay.”) The visual system, which is largely without language, just keeps looking for ways to solve the problem according to another kind of logic – visual logic.

To sum up, the point of the seemingly simple “Vase/Faces” exercise is this:

In order to draw a perceived object or person – something that you see with your eyes – you must make a mental shift to a brain-mode that is specialized for this visual, perceptual task.

The difficulty of making this shift from verbal to visual mode often causes conflict. Didn’t you feel it? To reduce the discomfort of the conflict, you stopped (do you remember feeling stopped short?) and made a new start. That’s what you were doing when you gave yourself instructions – that is, gave your brain instructions – to “shift gears,” or “change strategy,” or “don’t do this; do that,” or whatever terms you may have used to cause a cognitive shift.

There are numerous solutions to the mental “crunch” of the “Vace/Faces” Exercise. Perhaps you found a unique or unusual solution. To capture your personal solution in words, you might want to write down what happened on the back of your drawing.

Print Friendly, PDF & Email

Still Life Drawing

In connection with the Composition Tricks Post, we will be using our viewfinders to create a composition for a still life drawing.

A still life is a drawing of arranged objects. For example:

Still-Life-deedeeflower-19541769-1245-945

It’s typical to use pottery, flowers, and fruit in an arrangement.

pigott-still-life-with-5-bottles-2011

Sometimes they can be kept super minimal and simple.

henrik-bonnevier-still-life-photography-1

Other times, they could be bold and have many parts which allows you to zoom into smaller parts instead of drawing the entire thing.
fruit_bowl_with_bananas_fs

Hatching

We will be drawing our still life using pencil, and you will shade it in with a range of values from dark black to whitest white. Feel free to use the color value chart and add some color in all or part of your drawing. Otherwise, choose and stick to one technique to shade your drawing. Here are some examples below:

still-life-contour-hatching

Cross-Hatching
11pilepotsinyoung

Loose Blending

still life

Smooth Blending

Project Guidelines:

  1. Use your viewfinder to find an interesting composition using the “rule of thirds.”
  2. Lightly sketch the outlines of your objects onto your paper.
  3. Choose a technique to shade in your project.
  4. Find the darkest shades first and shade those in.
  5. Find the medium values and work your way to the light values.
  6. Leave white paper showing for the lightest values.
  7. Add watercolor to the background; black watercolor for the cast shadow.  Cover up your drawing with some paper, and use your brush full of watercolor to flick it on the painting to add droplets and texture.

value still life

photo 1

photo 2

Rubric:

Composition (0-25 points):
Did you plan your design carefully? Is a focal point used correctly? Did you employ the elements of art and principles of design?

Craftsmanship/Presentation (0-25 points):
Is the work complete? Are all marks intentional? No rips, tears, smudges, folds, stains, etc. The work needs to be presented properly.

Following Directions (0-25 points):
Did you follow the criteria to complete the pieces? Did you make the most of your time to make improvements when needed?

Design Concept (0-25 points):
Did you create an original composition? Is plagiarism of imagery involved? How aesthetically pleasing or visually interesting is the work?

Print Friendly, PDF & Email

Tricks of the Composition Trade

Composition isn’t just about rules, rules, and more rules. There are also plenty of nifty devices and tools that make an artist’s job a lot easier.

Over the centuries, artists have invented clear, user-friendly devices as stepping stones to creating great works. Future artists will no doubt benefit from the latest hi-tech developments, in the same way that many art inventions from the past still have relevance today. If you like taking photographs, you’ll be familiar with the notion of a viewfinder, a “window” in the camera that you look through to frame your subject before clicking the shutter. Without it, great pictures would not be possible. Artists use a similar device to help frame their subject and a basic grid to help place the elements making up a composition. Proportions can be measured accurately without the need for clever machinery through shortcuts that are simple to use and work. They don’t constitute cheating so don’t be afraid to try them!

Making a Viewfinder:

It’s easy to construct a totally adjustable and completely portable viewfinder. You can use it whenever you need to make the compositional decisions that are an essential part of producing good art.

  1. You will need two L-shaped brackets that are 3 inches wide and 10-12 inches long. Make sure the corners are perfect right angles. Use stiff dark gray or black cardstock that won’t distract your eye from the subject.
    photo 3 copy
  2. Place your L shapes together so they form a rectangular window that frames your subject. You can hold them together with masking tape or bulldog clips.
    photo 3 copy2

Viewfinders and the “rule of thirds”:

Create attention-grabbing compositions quickly and easily with the “rule of thirds.” Divide your picture area into three horizontal and three vertical segments (picture the grid in your head or sketch it lightly on paper). Use the lines in each direction to create a dynamic asymmetrical composition (much more exciting than a boring symmetrical arrangement)!

Apply the “rule of thirds” with the help of your viewfinder. With a black marker and a ruler, divide two acetate sheets into three equal columns. Line them up to form a grid of nine equal rectangles. Clip them together between your two L-shaped brackets and you’ve got an instant see-through grid! Wow!

  1. Hold the viewfinder grid out at arm’s length, close one eye, and look at your subject through the window. Move the frame around until you find an interesting and balanced composition.
    photo 2 copy
  2. In this drawing, the viewfinder helps create a balanced composition using the “rule of thirds.” The apples are placed in the outer thirds of the frame, leaving the center empty, so that the eye is compelled to keep on moving from one apple to another. If the pieces of fruit were centrally placed, the piece would look far more static and dull.
    photo 1 copy
Print Friendly, PDF & Email

Self-Portrait

Before Portrait:

Your first assignment is to look in a mirror and draw yourself from the shoulders to the top of your head. Fill the 12″ x 9″ page as much as possible.

The Proportions of a Face:

Human Ear Tutorial

Human Hair Tutorial

Human Eye Tutorial

Human Nose Tutorial

Human Mouth Tutorial

Human Face Tutorial

After Portrait:

Now, after knowing the facial proportions, draw yourself again using the proportions we discussed.

Students’ Before (left) and After (right):

Print Friendly, PDF & Email

Agamograph

We are going to be creating kinetic art, called an Agamograph, using the skills we learned creating a portrait and facial proportions!

First we will be drawing a self-portrait using the grid method we learned in class and add shading and value with Ebony pencil or colored pencils.

Next, you will draw another grid and mark where the eyes and mouth are located from your photograph. From those points of reference, you will create your “alter ego” or another version of yourself. Maybe you morph into a super hero or a villain. Maybe you become a cat or another animal. Maybe you become a slice of pizza or your favorite food. As long as the eyes and the mouth match up to your previous portrait, the illusion will work and work well.

After drawing and shading in each portrait, you will be creating the agamograph board. You will be using a 10″ x 10″ poster board for the backing, and you will have a 16″ x 10″ board to fold accordion style. Once folded, stretch it across the 10″ background and glue down alone the edges to the backing. You might have to hold it there for a minute. Let dry over night.

Once your agamograph board is dry, you will cute your portraits into 1″ strips. Glue down one portrait on one side of the accordion folds, then glue down the other portrait along the other side of the accordion folds.

Write your name and class period on the back and you are done.

Rubric:

Composition (0-25 points):
Did you plan your design carefully? Do your eyes line up with your alter ego? Did you employ the elements of art and principles of design?

Craftsmanship/Presentation (0-25 points):
Is the work complete? Are all marks intentional? No rips, tears, smudges, folds, stains, etc. The work needs to be presented properly. Folds in poster board are clean and evenly spaced. No heavy glue around the edges.

Following Directions (0-25 points):
Did you follow the criteria to complete the piece? Did you use most of your time to make improvements when needed?

Design Concept (0-25 points):
Did you create an original composition? Is plagiarism of imagery involved? How aesthetically pleasing or visually interesting is the work?

Print Friendly, PDF & Email